|
Machine Knitting FAQ
 TONING THE BODY TONING THE BODY
 Do you know that machine knitting is an ideal way to exercise the muscles in your hands, arms and across your back and also on your bottom and thighs? If you want to stay toned it is a mistake to buy yourself a motor to do all the work for you. Do you know that machine knitting is an ideal way to exercise the muscles in your hands, arms and across your back and also on your bottom and thighs? If you want to stay toned it is a mistake to buy yourself a motor to do all the work for you.
How often do you cast on approximately 150 needles and knit 250 rows without stopping for a rest? That is the back of an average drop-sleeve 4 ply sweater and should take a matter of 10 minutes to complete, perhaps with a short halt in the middle to mark each end with some contrast yarn. When I first started machine knitting I could not knit this far without my muscles aching today it means nothing and I can carry on zipping to and fro through to 450 rows of an afghan or poncho length.
Today I have a decent grip, a strong back and rippling muscles down my forearm which all stands in good stead for me since I am an ancient old bag who has no interest in morning constitutionals or aerobic classes.
THE EXPERTS ADVICE
 I advise the new machine knitter to avoid these people until you have learnt the language of machine knitting and know the names of every part of your machine. This group knows they are part of a group and their membership depends on who has had the most articles, books or patterns published. They know it all and each do their damnedest to stop anyone new arriving on the scene with any useful know-how that does not fit in with the standard old-fashioned way of using a knitting machine. The age group of this group is likely to be well over 70, if not in body then certainly in mind. I advise the new machine knitter to avoid these people until you have learnt the language of machine knitting and know the names of every part of your machine. This group knows they are part of a group and their membership depends on who has had the most articles, books or patterns published. They know it all and each do their damnedest to stop anyone new arriving on the scene with any useful know-how that does not fit in with the standard old-fashioned way of using a knitting machine. The age group of this group is likely to be well over 70, if not in body then certainly in mind.
They are the ladies who have written pamphlets and books with pictures that appear inviting until you read them and realize they are giving you instructions for your machine in a language you do not understand and a method that does not work that is to say, it does not work for you. Instead of their methods working out smoothly, your knitted piece drops stitches at each end of the carriage, then the carriage jams halfway along the needles, and finally the whole lot falls off the machine and unravels as it travels down to the floor below.
Expert or not, machine knitting is trial or error depending on whether the machine is feeling friendly that day. Learning to use the machine is all about following the manual to the word.
Tension is your enemy. Tension is in the unraveling of the yarn from the cone and feeding through the yarn tension unit and your carriage smoothly and without catching loops on the gate pegs. It is important to keep the yarn unit clean because it will pick up not only bits of fluff and threads but also residue dirt from the atmosphere including the steam from your hot coffee and sticky stuff from your cigarettes. Regularly clean the springs and discs and wires with white spirit on a piece of cloth.
 KNITTING CLUBS KNITTING CLUBS
The new machine knitter needs to be very careful not to end up with a cupboard filled with outdated newly knitted garments.

Dont get me wrong here these garments will likely receive lots of admiration from members of the local knitting group, but these same people are not looking at your garment for a fashion statement. They are more interested that you have completed a project like those awful sewing projects we had to finish at school for the exam piece. They will be just as impressed if you knit a fair-isle blanket for the dogs basket as they would if you walk in wearing a grotesque woven suit.
These are the same people who will give you the enthusiasm to knit shapeless cardigans and stiff coats. At the yearly machine knitting exhibition you will feel honored to be asked to personally model your knitwear, chuffed when your name is called out as The Designer, and blush as you stand there wearing your design.
And that is all that happens - nothing more. All you have left is to take your garment back home since it is no longer of any interest to anyone.
Knitting Clubs are for those who want praise, generally for still being alive & kicking. These people do not promote decent prices for sales of your work. If you decide to take an order from one of them, the likelihood is that you are working for approximately 20% of the minimum base rate and that is not counting the cost of the yarn. This is why the Knitting Clubs have rows and rows of baby bootees, lavender bags and dolls clothes at their sales.
DESIGNER DESIGNS
 I often wonder if knitwear pattern designers have the slightest idea that the majority of their lovely sweaters are never knitted by anyone other than themselves solely because the pattern instructions use a tension which is almost impossible to get correct. I have thrown thousands of lovely ideas into the bin just because of the tension problems. I cannot be bothered to work it all out hoping that the finished garment will look good. I often wonder if knitwear pattern designers have the slightest idea that the majority of their lovely sweaters are never knitted by anyone other than themselves solely because the pattern instructions use a tension which is almost impossible to get correct. I have thrown thousands of lovely ideas into the bin just because of the tension problems. I cannot be bothered to work it all out hoping that the finished garment will look good.
Frequently it does not.
Tension is not all about making the stitches match the pattern - it is about knitting a piece which feels right to you and working out from that swatch how many stitches and rows for your pattern. There is nothing quite as awful as seeing sweaters knitted up in too tight a tension. They dont need anyone to put them on to see what they look like as they stand up stiff on their own!
 When you feel the knitwear for sale in the shops you will notice that frequently the stitches are loose enough to put a child's finger through them. This does not mean that the sweaters keep their shape any better. They look good to buy and people do. It is worthwhile going to look through well-worn sweaters in secondhand stores to see what happens to them. When you feel the knitwear for sale in the shops you will notice that frequently the stitches are loose enough to put a child's finger through them. This does not mean that the sweaters keep their shape any better. They look good to buy and people do. It is worthwhile going to look through well-worn sweaters in secondhand stores to see what happens to them.
 Cotton knits in stocking stitch have no natural elasticity which means that the minute you sit down they will stretch width ways. Knitting in elastic on the welt will make no difference to what happens to the rest of the garment. When I want to knit with cotton I use a tuck stitch to give texture and strength to the fabric. I also knit a tension swatch which I steam iron to find the right tension before knitting the final. Each tuck stitch gives a different measurement. I only knit summer tops which reach to my hips. This length is likely to fold slightly into my back which, when the garment stretches, gives me some shape instead of a huge girth all the way around. Anything longer will stretch a lot more to cater for your hips and bottom when you sit down probably around twice the width you knitted. Cotton knits in stocking stitch have no natural elasticity which means that the minute you sit down they will stretch width ways. Knitting in elastic on the welt will make no difference to what happens to the rest of the garment. When I want to knit with cotton I use a tuck stitch to give texture and strength to the fabric. I also knit a tension swatch which I steam iron to find the right tension before knitting the final. Each tuck stitch gives a different measurement. I only knit summer tops which reach to my hips. This length is likely to fold slightly into my back which, when the garment stretches, gives me some shape instead of a huge girth all the way around. Anything longer will stretch a lot more to cater for your hips and bottom when you sit down probably around twice the width you knitted.
 Acrylic knits will grow lots of fluff bobbles. I use a battery operated sweater shaver to get them off. I used to use my husbands electric razor which works 10 times better but he found out. I thread shirring elastic very loosely through the cast-on row of my welts and this keeps them in excellent shape for years. Acrylics wash best if you have a cold water setting or up to 30 degrees in your wash tub. While the wash instructions say you can use up to 40 degrees your washing machine may have different ideas about the heat setting and ruin all your efforts. It is for that reason why I make my welts independently from the main sweater and graft them on. I can knit another welt if I ruin the first in the hot tub. Most inexpensive sweaters are made with acrylic. Acrylic sweater dresses will `seat` and look ugly around your midriff. Acrylic knits will grow lots of fluff bobbles. I use a battery operated sweater shaver to get them off. I used to use my husbands electric razor which works 10 times better but he found out. I thread shirring elastic very loosely through the cast-on row of my welts and this keeps them in excellent shape for years. Acrylics wash best if you have a cold water setting or up to 30 degrees in your wash tub. While the wash instructions say you can use up to 40 degrees your washing machine may have different ideas about the heat setting and ruin all your efforts. It is for that reason why I make my welts independently from the main sweater and graft them on. I can knit another welt if I ruin the first in the hot tub. Most inexpensive sweaters are made with acrylic. Acrylic sweater dresses will `seat` and look ugly around your midriff.
 Every type of fluffy yarn which can be washed should be done by hand and preferably in cold water. The washing machine is useful for a light spin with the garment inside a wash-bag or pillowcase, but do not use the long spin. I have knitted with some beautiful mohair yarns, though I do prefer to crochet. My mohair cardigans generally end up in the cats basket after a few years. That is when I wash them in the machine so they felt up for the cats kneading. Cats adore mohair. Never leave mohair hanging around on a chair or your bed if you have a cat because the cat will find it and pull it around for an hour and you will find clumps of loose fluff everywhere. Every type of fluffy yarn which can be washed should be done by hand and preferably in cold water. The washing machine is useful for a light spin with the garment inside a wash-bag or pillowcase, but do not use the long spin. I have knitted with some beautiful mohair yarns, though I do prefer to crochet. My mohair cardigans generally end up in the cats basket after a few years. That is when I wash them in the machine so they felt up for the cats kneading. Cats adore mohair. Never leave mohair hanging around on a chair or your bed if you have a cat because the cat will find it and pull it around for an hour and you will find clumps of loose fluff everywhere.
 Lambs-wool is lovely. Wool can itch whether it says it is anti-tickle or not. Children hate it. Wool does not stretch. It knits up beautifully if it is a Fine 4 ply because your knitting machine does like Fine 4 ply best of all. I always advise a tension swatch for knitting with wool solely because it does not stretch and knits tighter than an acrylic. Some wool garments may grow a few fluff bobbles, little tiny ones. Lambs-wool is lovely. Wool can itch whether it says it is anti-tickle or not. Children hate it. Wool does not stretch. It knits up beautifully if it is a Fine 4 ply because your knitting machine does like Fine 4 ply best of all. I always advise a tension swatch for knitting with wool solely because it does not stretch and knits tighter than an acrylic. Some wool garments may grow a few fluff bobbles, little tiny ones.
 I remove those with sticky tape rub it on and rip it off, bit like waxing without the heat. Wool should hold the elasticity and the welt should jump back into shape when you wash a sweater. I remove those with sticky tape rub it on and rip it off, bit like waxing without the heat. Wool should hold the elasticity and the welt should jump back into shape when you wash a sweater.
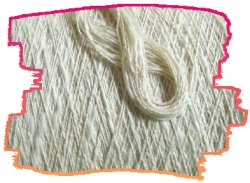
Machine Knitting Yarns 2/24 or 1/12 or 2/30 on cones.
High bulk acrylic yarn is a sweater type yarn, great for afghans, blankets, baby garments, sweaters, skirts, ponchos, shawls, socks, jackets, cardigans, and much more.
On the standard machine which is a 4.5 mm machine knit using 2 strands of the yarn at tension 7 for about 7.5 stitches per inch. (2 cones of yarn on the floor and take the yarn from each cone and feed it through the machine as one yarn). Use the same tension when using the garter carriage attachment.
How to Test Fibre Content of an Unknown Yarn with Bleach
This is a simple procedure that will tell you if the yarn is of animal, plant or synthetic origin. Pour a little bleach into a bowl and then cut off a short length of your yarn and drop it into the bleach. After a minute or two this is what happens:
- If the bleach begins to bubble then the yarn comes from an animal, including the silkworm, and will dissolve in less than an hour.
- If the yarn starts to lose its color and goes white then it is made from a plant.
- If the yarn floats then it is an acrylic yarn that will not be changed by the bleach even though it may lose some colour.
- If the yarn starts to bubble but it does not disappear completely then it is likely to be a blend of wool or silk and acrylic.
How to Work out Tension Swatches

How many times have you looked at a knitting pattern, thought you could easily do it, then realized that the tension swatch is based on something along the lines of 26 stitches and 42 rows = 10 cms, or even 24.5 stitches and 52 rows = 14.5 cms???
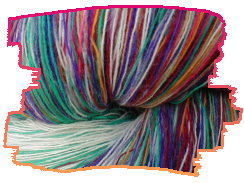
What on earth does that mean? What was the problem with rounding the tension up to usable figures? Which particular machine did they use, was it well oiled and what was the state of their sponge bar? Are they taking into account that white yarn has a different thickness to coloured yarns? You got to sit on that machine for hours on end trying to get a tension match? You must be kidding! Once again it is the experts messing around with us and making darned sure that we never bother to knit their creations or if we do and it doesnt fit then it must be because we didnt get the tension correct. In my opinion THEY didnt get the tension right and WE have to correct their mistakes.
Exasperated, you throw the patterns into the back of the cupboard and look for something else to knit. I sometimes believe that the printed patterns you find in magazines deliberately give you these impossible tension measures solely because you will then go in search of another - thereby subscribing to more issues with even more impossible tension swatches to match.
I have to be honest - I have stuck to a small selection of patterns solely because of tension and not wanting to waste my precious time. Even though I use a Brother knitting machine, I stick to the Knitmaster Modern Knitting patterns - no, not the current issues of Modern Machine Knitting, but the old ones from the 80s. The only problem I ever found with the sweater patterns was that they may be 2 or 3 inches too long and that is easy to change - just knit less rows! I love the way they give extra room under the armpit. Growing up in that era where sweaters and cardis fitted into the armpit and obviously became smelly with sweater or deodorants, I was heartily glad when it became fashionable to wear looser clothing.
While centimetres are the politically correct measurement, they are almost impossible to work with in machine knitting because they are too exacting to stitch and row division and become teensy weensy fractions.
It is much easier to work out a measurement of 22 inches than 56 cms.
HOW TO DO THIS
- Refer to the Metric Conversion Chart below to convert your measurements.
- Use a calculator and a tape measure with both inches and centimetres.
- Cast on 50 stitches (25/25) with the cast-on comb and waste yarn and knit a few rows. Hang 2 claw weights onto the comb.
- Change to main yarn and your pattern. Knit a selection of rows using different tensions until you are happy with one.
- Change to waste yarn, knit 4 rows.
- Row counter 000. Change to main yarn and using the tension you liked the best knit 100 rows in the pattern.
- Change to waste yarn, knit 6 rows and cast off.
- You can light press this piece of fabric - or leave it under a few heavy books overnight - or, if you know your fabric, just pin it out flat on the living room carpet, stretching it only as much as you believe it will stretch when you give the finished garment a final press. If you press your tension square with the iron you will not be able to unravel it and use it again except as waste yarn or sewing up yarn because the elasticity of the yarn will have been damaged, so only press when you know you have plenty of yarn left on your cone.
- Measure the length of the 100 rows in inches. Then divide 100 by that measurement.
- (example: 100 rows = 6 inches. Divide 100 by 6 = 16.5 rows to the inch. So if a pattern calls for 56 cms long, that is 22 inches. To calculate how many rows, all you need do is multiply 22 by 16.5 rows = 363 rows.)
- Measure the width of the 50 stitches in inches, divide 50 by that measurement.
- (example: 50 stitches = 8 inches. Divide 50 by 8 = 6.25 stitches to the inch. So if a pattern calls for a width of 51 cms, that is 20 inches. To calculate how many stitches, all you need do is to multiply 20 by 6.25 = 125 stitches.) (That is the tension square I use for tuck stitch using T7 on a standard gauge machine using 4 ply or 2 strands 2/30s.)
How to change a Sweater into a cardigan
- Find the exact middle stitch of the front and baste a contrast piece of yarn through it for the length of the sweater.
- With a straight stitch on your sewing machine, sew twice on both sides of the red yarn. You have to make sure you are not sewing through the back of the sweater.
- Cut between the stitching lines and hold the edge up to the knitting machine to see how many stitches you need to make a band and how many buttonholes you need.
- Make the 2 inch bands on the knitting machine and attach them to the garment
ScanTheCat © copyright 200
 4 4
|